Really Big Hatch
Here are some planes featuring the "Really Big Hatch", and the original article from Velocity Views 11 and Velocity Views 20, courtesy of Ric Lavoie.

From Dave Black, Woodbridge VA VV11
REALLY BIG HATCH
“My advice is to make your canard removal as easy as you can, because it will be removed a lot.”
J Howard — on the Velocity Reflector
“Having removed/replaced the canard many times during flight testing and instrument work, I think this idea of a removable top to the canard may be one of the truly great ideas I have seen in the last two years. I may do this shortly myself, even though I thought I was done with structural work”
Bob Ginsberg — on the Velocity Reflector
If you’ve talked to the owner of a flying Velocity, no doubt you’ve heard how often the canard must be removed for maintenance access to the nose area. And you may appreciate what a pain it is to remove the entire canard each time you need to access your instruments, radios, nose-gear mechanism, oil cooler, or gear pump.
My own experience with my plans-built Tiny Nose Hatch showed it to be, for most purposes, too small to reach through AND see through at the same time. It is located too far forward for convenient access to the hydraulic pump, and is too small to allow easy installation of the battery or canard lift bolts. For serious maintenance in the nose area, you must remove the canard and use the combination of the two holes for access. That often means reaching through one hole while looking through the other — working around that “bridge” in the middle.

Add to this the difficulty of removing the canard. In my Unidoor, I must climb upside-down under the instrument panel to reach the canard bolts, the elevator linkage, and the trim wiring before I can even remove the canard. With an Elite the canard bolts are a little easier to get to, but you still must remove the entire canard for access into the nose. You only have to incorrectly reassemble the canard and elevator system once to ruin your day.
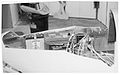
The idea for a Really Big Hatch (RBH) evolved out of a roundtable discussion among several builders on the Velocity Reflector. In the end I decided to put my money where my mouth was and replace my beautiful (but useless) Tiny Hatch. The RBH effectively combines the Tiny Hatch and the Canard Cover into one convenient, easily removable hatch. The aft end of the RBH remains at the same location as the aft end of the Canard Cover specified in the plans. The side-to-side width of the removable hatch is limited by the 3” layups of Triax on the inside of the Canard Cover. Those layups MUST remain attached to the canard as they are structural for the anti-torque tabs. (I took the precaution of running the Really Big Hatch idea past Duane, who gave it his blessing, with the caveat that I not cut within the triax layup immediately above the canard.) Thus the “Loose Ends” seen in the photo of our modified canard. The hatch turns out to be plenty wide.
Front-to-back along the skin centerline, the RBH measures 23 1/4”. This size allows easy access to everything from the landing light to the instrument panel without making the hatch so large it weakens the nose structure. The width at the front of the hatch is 20”. Its rear width is 33 1/4” (All measurements along the skin surface). All of our cut lines are straight; the front corners have a 2” radius. If you want an even larger hatch, the RBH could be stretched forward a few inches. It should still work as long as you put adequate reinforcement around the perimeter of the opening. I’d use the layup schedule of the “bridge” and between the canard cover and the windshield as a guide to reinforcing the perimeter.

By the way, the vertical elements at the front of our canard and inside the cover are the two halves of a bulkhead which separates the nose area from the cockpit. This keeps squirrels and birds out of our fuselage, and reduces unwanted breezes during flight. It should be of great value in cold weather.
Here’s a procedure which will allow fabrication of the RBH, flanges, and securing system just before permanently installing the Fuselage
Top:
1) Install Canard in Fuselage Bottom. Bolt in place.
2) Fit Fuselage Top in position, relieving around the Canard.
3) With everything in precise alignment, draw where the canard cutout (rear of the RBH) will go.
4) Decide the size and shape of the RBH. Draw that on the skin.
5) Confirm that the geometry of the Loose Ends and the RBH will allow removal of the canard (with Torque-Tubes) once everything is completed.
6) Remove the Top from the Fuselage.
7) Cut out RBH (but not Loose Ends).
8) Finish RBH and fabricate flanges all the way around.
9) Install RBH securing system of your choice.
10) Fasten hatch cover in place on top.
11) Permanently install Fuselage top to Fuselage bottom.
12) Open RBH.
13) Tie Canard to Loose Ends with Triax layups outlined in the Manual.
14) Cut out Loose Ends and finish.
To reduce the number of screws while simplifying hatch removal, we used five 3/16” pins along the rear of the RBH. The front of the RBH is secured by three screws, with two more screws along each side. This many screws may be overkill, since Bubba’s Tiny Hatch is secured by a single spring-loaded latch. But I’d rather be safe than sorry, as you don’t want a Really Big Hatch going through your windshield or prop. With a little inventiveness, you can make your latching system completely invisible. We fastened our RBH only to the Fuselage, not to the canard or Loose Ends, as that would cause the RBH to flex in flight when the canard does.
Benefits of RBH:
1) No “bridge” in the way of maintenance work.
2) Roomy access right where you need it.
3) Much simpler to remove canard.
4) 95% of the time you don’t need to remove canard at all!
5) Much easier to access all systems in nose.
6) Save time on maintenance.
7) Easier to build than Tiny Hatch plus Canard Cover.
It’s amazing how enlarging the canard hatch by only 9” can make such a difference in access to the
nose. What’s not to like? I just can’t express how happy I am with this mod.
The Really Really Big Hatch!
From Lino Moya, Albuquerque, Velocity Views 20

When we set out to attach the canard and finish the upper fuselage, we realized that the standard
hatch was way too small especially considering we had a larger battery and a second battery that went in the nose section of the airplane.

This modification is a retrofit to the original hatch design. We needed access through the existing hatch to build the really really big hatch.

There may be other ways to do it but this is how I did it. First I attached the canard and upper fuselage section as per the manual and cut loose the upper fuselage section over the canard as per the manual. Next I beefed up the area where the Continued on the next page fuselage halves meet with microglass to make a smooth uniform surface to attach the flanges.
Then I reinforced this area with a four inch wide strip of two layers of triax and one layer of bid. I also put a four inch wide strip of this same glass combination centered 13 inches from the nose across the top half of the fuselage. Right down the middle of the layup is where I made the other three cuts for the really really big hatch.
After I cut the hatch and smoothed the edges and did any necessary filling to make the hatch
fit back onto the fuselage smoothly I temporarily glued it in place and made a flange that connected to the hatch and overlapped the lower fuselage 1 1/2” on the side and 3/4” at the top and bottom. I attached four nut plates per side and two nut plates on the top and one on the bottom. I used countersunk screws and tinnerman washers to hold everything together. I added additional reinforcement in the nose and the upper part of the fuselage at the canard.
Al Gietzen was kind enough to submit these pictures of his Really Big Hatch on his standard RG N755V. Click the image to see a larger version.


N787SB

N173EX

N173EX

VV11

VV11
VV20

VV20

VV20

N755V

N755V

N755V

